Spring(1) spring web project start
노트북을 새로 장만해서 개인 프로젝트를 생성하여 여러 기능을 붙여보고 싶은데 프로젝트 셋팅해본지가 너무 오래되서 정리해보면서 셋팅함.
STS install
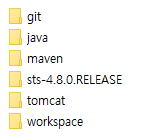
우선 Spring 프로젝트를 생성하기 위해 STS https://spring.io/tools 다운로드하고 폴더를 정리함.

위와 같이 git을 사용할것이기 때문에 미리 폴더를 생성. java도 따로 폴더를 만들어 혼동이 없도록 STS폴더안에 정리함.
maven프로젝트로 생성할것이므로 maven버전이 꼬이지 않도록 따로 셋팅하고 사용할 톰캣도 폴더를 만들어 둠.
Java install
oracle홈페이지https://www.oracle.com/java/technologies/javase-downloads.html에서 원하시는 버전의 jdk를 원하는 경로에 받아줌. (저의 경우 자바 1.8버전으로 사용 할 STS 하위에 만든 java폴더에 넣어줌)
tomcat install
web서버 사용을 위해 원하는 버전의 tomcat 다운https://tomcat.apache.org/ .평소 9버전을 사용했기 때문에 tomcat9로 받음.
oracle
- DB는 local에 설치하기 부담되서 우선은 AWS의 RDS를 활용해보려한다.https://aws.amazon.com/ko/
- AWS RDS에서 데이터베이스 생성후 해당 인스턴스 정보로 DB접속
- SQL developder 설치https://www.oracle.com/tools/downloads/sqldev-downloads.html
Spring project 생성
- 프로젝트 생성
File > new > other > spring legacy project로 프로젝트 생성.- spring legacy project 에서
spring MVC project생성.
- git 연동
- github에서
git repository생성 한다. - 위에서 생성한 프로젝트의 파일들을 업로드
- STS에 git 프로젝트를 import
- github에서
- tomcat
- server에 아까 다운받은 tomcat9를 추가
- java
- 프로젝트 우클릭 > build path > configure build path > library 탭에서
jre system library를 지우고 다운받은 jdk로 추가 Windows > preferences > project facet에서 java 버전 변경
- 프로젝트 우클릭 > build path > configure build path > library 탭에서
- Test
- server start 후 로컬[http://localhost:8080/]으로 접속하여 확인.
댓글남기기